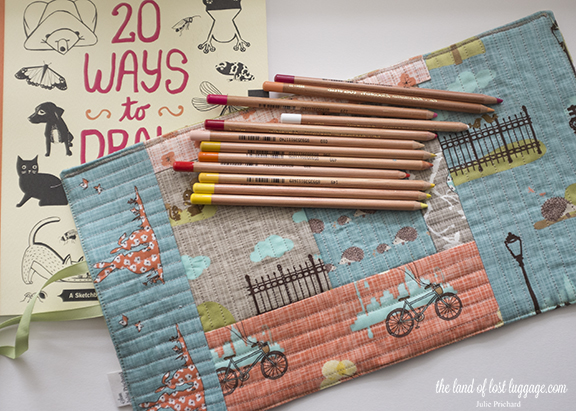
Making a Pencil or Brush Roll. #DIY #Sew
I'm enjoying sewing stuff! My daughter's pal (who loves to draw) is turning 8. Every morning when she comes in to school, she is toting drawings she made the night before. I love her determination. I picked up, "20 Ways to Draw a Cat" on Amazon and thought it would be perfect for her. To go with it, I am picking up some pencils, erasers and a sketchbook. Since I can't stop sewing, the pencils and various pens will come packed inside a roll like this one. Personalized, of course.
I used the "Quilt As You Go" method that I learned in this online workshop. The workshop is for a potholder and a tote bag, but I adapted it of course.
There are so many websites that offer tutorials for this sort of thing..I can tell you my measurements and you can adapt to suit:. For this roll, I cut:
A rectangle of cotton batting 10.5x17"
Exterior fabric 10.5x17"
Interior Fabric 10.5x17"
Pocket fabric 5.5x17"
The QAYG method utilizes fabric scraps...so if you've got some of those, you're good to go. I have these fabric panels cut to make a second brush roll that will not be patchwork as shown here.
Quilt the exterior. Once finished, take the pocket fabric and press a 1/4" seam along the top. I used decorative stitching on the top. Once the top seam is sewn, attach the pocket to the fabric you have chosen to be the interior fabric. Stitch the pencil dividers. I marked lines every 3/4" all the way across. In retrospect, some little pockets with wider openings would be ideal for the artist who carries a variety of tools. Add personalization to the interior fabric at this step if desired. (I machine embroidered a note to the recipient above the pocket, left side.)
Place ribbon and the "made by" label in-between the exterior and interior panels, with the excess to the outside, right sides together. Stitch all the way around the two panels, leaving a 3" opening to turn. I allowed for a 1/4" seam allowance. Turn the project inside-out.
Add decorative stitching on the top of the project now, this will close up the opening that was left from turning the project right-side out.
I opted not to use a button on this roll, but the ribbons tie together nice and casually, which is what I prefer. Oh! Check out my new labels! I got them on etsy HERE. Cheap and really nice...and the seller has so many pre-made styles to choose from. I made this one myself in illustrator...I love it's simplicity.
There is no pattern or PDF to download for this project... hell, I don't even know if anyone is interested in it.... I only list what I would be looking for if I were to google "pencil roll" and see what was out there. Disclaimer: I am a beginning sewer who doesn't know very much...
Will you make one? Let me know.


